Mastering Digital SLR Photography – Basics, Workshop at Sangli

Mastering Digital-SLR Photography – Basics

Learn basics of Digital-SLR Photography with me, on 3rd April to 6th April 2017 in Sangli.

In association with Sun Art Studio, Sangli.

  • Understand your Camera
  • Understand what is exposure
  • Understand Histogram and learn how to read exposure of image from histogram
  • Understand relation between Aperture, Shutter Speed and ISO
  • Understand different shooting modes and how to use it
  • Understand and learn to use Manual Exposure Mode
  • Understand composition basics
  • Know different types of photographic filters and learn how to use it

Hurry, Book Your Seat.

LIMITED SEATS

For details contact me through contact form on this web site or call me on +91-9890941664

Sun Art Studio, Sangli, Tel.: 0233-2332892

Back-Button AF: What it is and how to use it?

Canon-5Ds-rear-1200Nikon-D810back-1200

One of the most frequent questions I have received is about Back Button Focus AF and how to use it on Canon and Nikon DSLR cameras. In this article you’ll learn what is Back Button Focus AF, and how to Back Button Focus AF for Canon and Nikon cameras.

For many years I used the shutter button to AF the subject. Some time I missed shot because my camera is in one shot AF Mode and subject (bird) moved very fast to capture. In shutter button AF mode you have to switch back and forth from One Shot AF to AI Servo AF depending on your subject.  Naw I use full-time Back-Button AF from last five years.

Canon is the  world’s first camera maker to incorporate such a feature, launching it back in 1989 with the EOS 630.

What is Back-Button AF?

The camera usually focuses when the shutter button is pressed halfway down, and then the photographer takes the picture when the button is pressed in fully. Many SLR cameras have offered photographers an option to change the way autofocus is activated. Often referred to by pros as “Back-Button AF”, this feature lets the user customize the camera so that focusing is performed by pressing a rear button on the top right back of the camera with the photographer’s right thumb. The shutter button still wakes up the camera with a half-press, and fires the shutter with a full press downward. You need to change a custom function or two to set up rear focus. And with some systems you set up rear focus via the camera’s menu. You can consult your camera body user manual to learn to set up rear focus.

Why would anyone want to remove AF from the shutter button?

This is a question many users ask me when Back-button AF is first explained to them. The standard method of operation, press the shutter button half-way down to focus, and then press fully to shoot it works perfectly. But back-button AF offers some significant advantages, especially for the experienced photographer.

  • Use AI-Servo for all time:

    The two main types of autofocus on your camera are (on a Canon) One-Shot and AI-Servo. On a Nikon they are called AF-Single (AF-S) and AF-Continuous (AF-C). One-Shot means that when you press your AF-ON button (or the shutter halfway down) your camera will set focus one time based on where the subject is at the given time. If your subject moves or if you move, you have to reset your focus. This method wouldn’t work very well if you were photographing subjects moving very fast, i.e. wildlife, birds or sports and action.

    That’s why there’s another method of focusing called AI-Servo (AF-C on Nikon). This method blew me away the first time I discovered it. Servo focusing actually tracks focusing on moving subjects. You can place a single focus point on subject in Servo mode and fire off as many shots as your camera can take before the buffer runs out. Assuming that you have a fast enough shutter speed, you should have a very high percentage of sharp, in focus images.

    So the thing I started to notice about having the camera in Servo mode is that I could use Servo just like One-Shot. You see, to use Servo focusing with Back-button AF you have to continuously hold down the AF-ON button to track focus. So if you have a still subject you can simply tap the AF-ON button and focus will stop adjusting when you let go of the button. I’ve found that if you have a still subject and hold down the AF-ON button in Servo mode, the camera will keep trying to work to find focus. So the subject will start going slightly in and out of focus because the camera thinks it should be looking for a moving subject. But again, if you simply tap the AF-ON button and let go when you see that your subject is in focus, you are good to go. When you practise this, it’s a very fast process that really takes no brain power or time at all.

    Aside from possibly better AI Servo AF tracking for Birds flight photography there are other advantages to using rear focus. In short, you have the best of all worlds all the time. When using rear focus you always have AI Servo (Continuous for Nikon) set. You will never need to switch back and forth from AI Servo to One Shot. To photograph flying birds or to focus track walking, running, or swimming birds (or perched birds that are changing their posture or head position almost continuously simply press and hold the rear button to focus track that you have set for AF and press the shutter button when you want to create an image.

  • Easier to lock focus:

    If you are shooting something like a series of portraits of a person, and you want them composed off-center, Back-Button AF makes it easy to take as many pictures as you want. Focus on your subject by pressing either the rear AE Lock button or if your camera is equipped with the rear AF-ON button. Once in-focus, take your thumb off the rear button. Re-compose the shot to move your subject off-center. Shoot as many pictures as you like. With focus activation removed from the shutter button, you now can fire any time you like, and remove your index finger from the shutter button after a shot is taken. The camera Will not re-focus when you press the shutter button half-way down again.

  • Easier timing of shots with a very active subject:

    Even with a very active subject i.e. birds, wildlife etc. that may be moving around, you can have your camera’s focus set to AI Servo AF (to track any movement), and just keep your right thumb on the back button to keep focus active, while your index finger can be ready to shoot with no worries about also preserving focus.

  • Less risk of focus errors with moving subjects:

    For wildlife, bird, sports or action photographers taking action pictures, back-button AF lets you stop focus whenever something might interfere with the moving subject you’re tracking without requiring you to stop shooting. In wildlife, for instance, it’s common that some another subject to come between the camera and a subject being photographed. With back-button AF, it’s easy to momentarily pull your thumb off the rear button, and you can still keep shooting by pressing the shutter button fully. The camera instantly stops focusing when your thumb comes off the back button. Once the obstruction is out of your way, you can immediately pick-up your primary subject by pressing your thumb on the back button again.

  • Easier over-riding of AF with full-time manual focus:

    Some lenses have a feature called full-time manual focus. Even if the lens’s AF/MF switch is in the AF position, these lenses allow the shooter to instantly adjust focus manually by simply turning the focus ring on the lens. There’s no need to first move the switch to MF. With back-button AF, this becomes a nearly top feature. Use the autofocus whenever you like by pressing the rear button with your right thumb. Shoot whenever you like by pressing the shutter button. And if you want manual focus, or override what the AF is doing, just pull your thumb off the rear button and turn the focusing ring. No matter how many pictures you shoot, pressing the shutter button will not auto focus.

  • Easier macro and close-up focusing:

    Many times, you’ll find that it’s actually easier to get consistently sharp close-up pictures of small objects by pre-focusing, and then moving yourself forward or backward until you see the critical sharp focus appear in your viewfinder. Once again, with back-button AF active, you can use the AF to get within general range (press the rear button with your thumb, then take your thumb off the button), and move a little bit to get things critically sharp. Most important, you can then shoot freely, without AF trying to re-focus each time you touch the shutter button. Finally, touching-up focus with the full-time manual focus feature on certain Canon lenses is simple and quick, and the autofocus never fights you by trying to un-do what you just adjusted.

I believes that when the shutter is released that AF tracking may be momentarily interrupted but when you use rear focus the camera continues to track well even when the shutter is released.

Activating back-button AF

You need to change a custom function or two to set up rear focus. And with some systems you set up rear focus via the camera’s menu. You can consult your camera body user manual to learn to set up rear focus. Remember, to use any Custom Function, your camera must first be in one of the P – Program, AV – Aperture Value /A –  Aperture Priority, TV – Time Value / S – Shutter Priority or M – Manual Mode.

Making the change from the shutter button to rear focus is first time hard and takes lots of getting used to, it takes a bit of retraining of the brain and the thumb to get used to rear focusing. But I have stuck with it for more than five years and will never go back.

Finally, remember that if you don’t like Back-Button AF , you can return the camera back to factory-default operation any time.

This is the beginning…..

My first awarded picture

Hi, I am Bhushan Raghavendra Shikhare and I want to thank you for your interest in my work. Welcome to the official Photography website and blog-site of Bhushan Shikhare. I am a fine art nature photographer specializing in wildlife, bird, nature and landscape photography. I am doing photography for more than 10 years. I currently live in Sangli, Maharashtra, India and use a variety of top professional cameras and lenses. My goal as a nature and landscape photographer is to show you views of our natural world in ways that you may not have seen them before through careful composition, attention to detail and the creative use of beautiful light.

I am a Jeweller and gemologist by profession and my journey as a nature and wildlife photographer started in May 2001, when I went for trekking to Dhana Kunu pass Trek with Yuvashakti, Pune, a beautiful place in Kullu valley of Himachal Pradesh, India. My mother gave me Olympus 35mm film camera with Zoom Lens (not exactly professional gear but that was highest quality camera I had then) during the trek I exposed 12 full 35 mm exposure rolls (In film camera days that was lot of exposure!). I wanted to participate in the photography competition (especially for participants) organised by Yuvashakti, Pune. At the time I was a beginner in photography so I thought why not show my photographs to Shri Mukundbhai Shah who founded ‘Pratibimb Amateur Photographers’ Club, Sangli’ and was excellent nature photographer. That was my first meeting with him. He told me that “Bhushan, your composition is excellent but there are some minor mistakes. I will tell you how to correct theme” He was my first Guru in photography. He selected 5 photographs for competition and I got second prize in the competition. From hear my photographic journey began. I could not get Mukundbhai’s guidance for long time because of his sudden death. After that I joined ‘Pratibimb Amateur Photographers’ Club, Sangli’. In that club I met Mr. Dilip Nerlikar sir who is very knowledgable person in every subject. I have been getting tremendous basic and professional level knowledge of photography from him.

Memories: I have Olympus point and shoot zoom lens 35mm film camera,of which  wide-angle range was limited. I wanted to show our base camp plus snow-covered mountain range in photograph. So I ran about 700-800 mtrs. on big hill near by the place and captured that award-winning photograph. I lost the  film due to moisture. photograph shown above is  a scanned image.

At present I am an active member and instructor in ‘Pratibimb Amateur Photographers’ Club’ in Sangli and working as an editor in Editorial Board of E-Magazine ‘Reflections’. Go to www.pratibimbsangli.org for more information about ‘Pratibimb Amateur Photographers’ Club, Sangli’. Many times my work was published in Newspapers, Magazines and Exhibitions. Please browse my site to learn more about my work. Images are available as prints, or for commercial licensing. My all work is available in the form of fine art prints created with various photographic papers and fine art canvas.  Volume purchases of three or more prints receive discounts off the entire purchase price. Don’t hesitate to CONTACT me. All images on this site are copyrighted to me , Bhushan Shikhare.

WANT TO BUY PHOTOGRAPH AS A PRINT?
PRICE FROM: INR 15600.00 / US $255.00

  • All prints are limited edition. Only 840 prints of any size will be made. I reserve the right to keep 15 of each limited edition prints for my own use. So essentially 825 prints are available for sale.
  • All Bhushan Shikhare limited edition prints are assigned a unique number and hand-signed by Bhushan Shikhare. Each image includes a certificate of authenticity.

Why you should be shoot in RAW?

You’ve probably heard over and over that you should be shooting in RAW. But do you know why it’s so important? And what it really means for your images? 

First off, what is RAWRAW is a file format that captures all image data recorded by the sensor when you take a photo. When shooting in a format like JPEG, image information is compressed and lost. Because no information is compressed with RAW you’re able to produce higher quality images, as well as correct problem in the images that would be unrecoverable if shot in the JPEG format.

In easy words, a RAW file is an uncompressed image file that records the data from the sensor ‘as it is’, with minimal processing. Depending on your camera, this file will most likely contain either 12-bit or 14-bit data or even 16-bit in medium format Camera. When shooting in JPEG, the camera will take the RAW file, process it with a number of generic actions (typically contrast/saturation adjustments, correcting for white balance and sharpening) before compressing the image down to an 8-bit JPEG file. That difference in ‘bit depth’ will took the main part here. The 12-bit image will contain 4096 tones per Red, Green and Blue channel. i.e. R-4096 X G-4096 X B-4096 = 69 billion possible tones per pixel. If we compare that to the other bit depths, you will see the difference:

  • 8 bit = 256 Tones per channel = 16.8 million possible tones per pixel.
  • 12 bit = 4096 Tones per channel = 68.7 billion possible tones per pixel.
  • 14 bit = 16384 Tones per channel = 4.4 trillion possible tones per pixel.
  • 16 bit = 65536 Tones per channel = 281.5 trillion possible tones per pixel.

When you take a JPEG file from your camera into Photoshop to process, there are only 256 possible tones to define the colour for each red, green or blue channel, which means that when you start apply changes to contrast or brightness, there are a very limited number of possible tones for each pixel, which can result in obvious image degradation if pushed too far.  With a RAW image, the number of possible tones is that much greater that more significant changes to can be made without any impact on the final image quality.

Benefits of using RAW:

1. Get the Highest Level of Quality

This is one of the biggest benefits. When you shoot in RAW you record all of the data from the sensor. This gives the highest quality files. And when it comes to your awesome images, you want high quality.

2. Record Greater Levels of Brightness

Levels of brightness are the number of steps from black to white in an image. The more you have, the smoother the transitions of tones. Smooth is good.

JPEG records 256 levels of brightness, and RAW records between 4,096 to 65,536 levels! This is described with the term ‘bit’. JPEG captures in 8 bit, and RAW is either 12 bit, 14 bit or 16 bit. The effect of higher bit depth on your images is huge. Those additional steps of brightness let you make more adjustments (exposure, blacks, fill light, recovery, contrast, brightness) to your image without a significant reduction of quality, because there’s more levels to work with! 

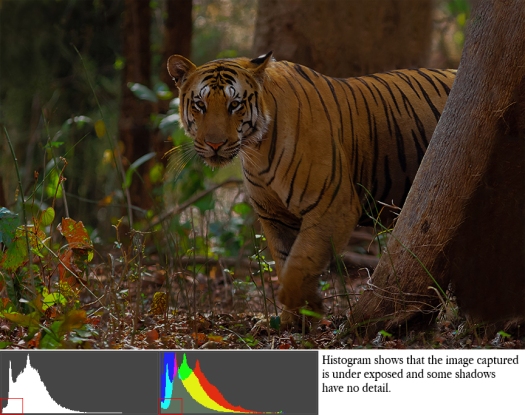
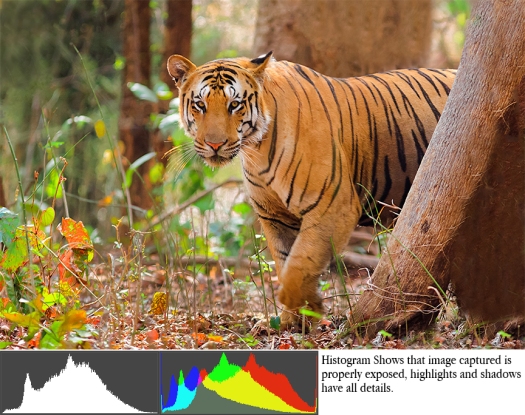
3. Easily Correct Overexposed or Underexposed Images

Obviously you want to get the best exposure in camera, but sometimes things move fast and you wind up with a overexposed or underexposed image. With RAW you have additional information in the file, so it’s much easier to correct the image without a drastic reduction in quality.

4. Easily Adjust White Balance

When you shoot JPEG the white balance is applied to the image. You can’t just easily choose another option. With RAW the white balance is still recorded, but because you have way more data, it’s easy to adjust. 

5. Get Better Detail

When you shoot RAW you have access to sharpening and noise algorithms in a program like Lightroom or ACR that are way more powerful than those found in your camera.

6. Enjoy Non-Destructive Editing

When you make adjustments to a RAW file, you’re not actually doing anything to the original data. What you’re doing is creating a set of instructions for how the JPEG or TIFF version should be saved. You can always reset your adjustments, and start over again.

7. Get Better Prints

Because of the finer gradation of tones and colours you’ll get better prints from RAW files. You’ll also get less Banding, which is really bad on a print.

8. Select Colour Space on Output

With RAW you can choose from any colour space when you are exporting it out, so you can adjust depending on the situation! Basically there are different colour spaces that work best for different situations, and when you shoot RAW you can export a single image in multiple spaces!

9. Have an Efficient Workflow

It’s easier to work through large batches of images when you’re using a workflow centric program like Lightroom or ACR. They’re designed to easily process groups of RAW images. Photoshop is not meant for that kind of thing, it’s built to handle one image at a time.

10. It’s the Pro Option

Professionals should be providing their clients with the highest quality possible. Hobbyists and amateurs can also take advantage of this pro level option, and get better files and prints!

In order to take full advantage of all the benefits of Lightroom and ACR or Photoshop you have to shoot in RAW!

One most important thing, there is a learning process associated with RAW processing.  You will need dedicated RAW processing software to manipulate your images, but cameras that support shooting in RAW should ship with the manufacturer’s own software for doing so.  There are also a large number of alternative free programs out there, as well as software packages from well know image editing giants, such as Adobe. With a little bit of research, you will see how easy it is to squeeze the most out of your images, and you will soon wonder why you weren’t shooting in RAW sooner.

Most cameras should give the option of shooting in ‘RAW+JPEG’, where the camera records both the RAW file and processed JPEG file to the memory card simultaneously.

Downsides

Now, there are always pros and cons to every option, and RAW does have a few downsides. 

NEED TO BE PROCESSED

A common argument against shooting RAW is that because the files need to be processed.

Most photographers do some level of processing to their JPEGs. RAW gives you way more options, and can be processed just as fast, if not faster, than JPEG.

TAKES UP MORE SPACE

Yes, RAW files are bigger and take up more space. But that’s because they’re of higher quality. Since RAW files have more uncompressed information they can be 2-3 times larger than JPEG files. This is definitely a concern for many shooters, especially those who create a lot of images.

But over the past few years, the cost of hard drives has really dropped, and they’re incredibly affordable!

It’s also probably a good idea to not place so many images on a single hard drive. Don’t put all your photographic eggs in one basket!

SLOWS THE CAMERA DOWN

RAW files are larger than JPEGs, so they’ll fill up the buffer of your camera faster. The camera will still shoot the same frames per second, regardless of whether it is RAW or JPEG, but you may have to wait for the camera to write to the memory card if the buffer fills up.

IN A PROPRIETARY FORMAT

RAW files are often recorded in a proprietary format, which means that the camera manufacturers haven’t officially disclosed how the raw data can be converted. Companies like Adobe either need to license software to decode the RAW files or reverse engineer how the files should be converted. (For Canon cameras the RAW format looks like .CR2 and for Nikon it’s .NEF).

A new open source RAW format has been developed in order to overcome this obstacle. It was developed by Adobe and is known as DNG (Digital Negative). Using a program like Lightroom or ACR, you can convert your proprietary RAW files into the open source DNG format. It’s an extra step, but it will ensure your files are readable far into the future!

These days, it’s super easy (and fast!) to process RAW files, and you’ll be able to get the absolute best quality out of those images that you put so much time and effort into!

I think, all of you will shoot in only RAW FILE after reading this information about RAW Format.

Understanding Histograms in Photography

Understanding Histograms in Photography:

Histograms display a graphic representation of the exposure on a captured image. They provide highly accurate information, but their use is often ignored.

How Histogram work?
Histogram-legend2
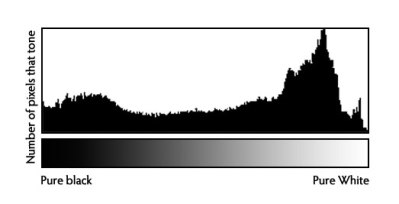
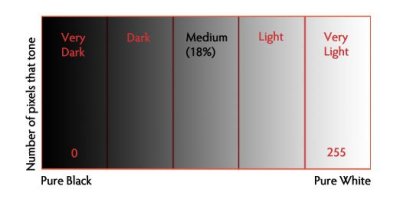
Histograms are a graph showing brightness levels of pixels in a recorded image. The camera’s processor arranges each Pixel recorded in sensor, on a horizontal scale on the histogram, according to its relative brightness from 0 ie pure black to 255 ie pure white.
Bright pixels are located on the right Side of the graph and darker pixels on the left side of the graph. Brightest pixels which are reproduce pure white and darkest pixels which are reproduce pure black with no detail, would be at the extreme right / left edges of a histogram. The height of the graph within a histogram Shows how many pixels in a scene were recorded at a given exposure level.

How to read a histogram :
Histograms Shows the brightness information from a specific image, but there are no “good” or “bad” histograms. Different subjects can generate completely different histograms, but both are properly exposed.
For example, a white Subject on a white background, if properly exposed, will generate a histogram to the right side, because there are no or very few shadows and mid-tones. In this example, all the pixels in the image will show a high brightness level in a properly exposed image.
a black Subject on a black background will display a histogram to the left, which normally would be a sign of under exposure, but in this case, in the actual scene, there are few mid-tones and no highlights. In this example, all the pixels in the image will show low shadow level in a properly exposed image.
So, the photographer needs to think of the subject and scene, if the subject is white against a white background, and a histogram shows lots of pixels in the middle of the image, it is a clear sign to the photographer that this particular image is under-exposed.Histogram-legend
One of the easiest ways to quickly use a histogram is to look at its graphic values, and simply ask if any of the bright areas on the right side, or dark areas on the left side, are touching edges of the histogram and the extreme left or right graph line extend vertically. Either condition indicates SOME area of the scene is reproducing as an over-exposed white, or an under-exposed black tone.
Now, it’s again up to the photographer to think for a moment. If the scene is a snow-covered field or a Person in a white dress in bright background, and the bulk of the histogram is pushed against the right edge of the graph and cut off along the right, it’s a clear indication that the image is over-exposed, and that another picture should be taken with reduced exposure.
But, it is possible to have a properly exposed scene with bright objects, such as the sun in the frame, which do appear as over-exposed areas. If these are the only areas in the scene that are washed out and the histogram is telling you that the image is over exposed but the exposure is actually correct. So don’t immediately think that there is a problem if part of the histogram is cut-off along the left or right side, until you have thought about the scene and subjects within it.
A histogram is a great tool for judging whether the brightness range of a scene will fit within the dynamic range of the camera. If the exposure graph fits within the histogram’s left and right margins, it means we have an easily workable and printable image. If the histogram is pushed up against either side, it means some parts of the image will be too light or too dark to reproduce with detail.
A “good” histogram doesn’t have to stretch entirely from the left to right side to indicate proper overall exposure. But if its peaks, large and small, all fit within the left/right borders, it is telling you that nothing in the scene will reproduce as a washed out white, or a black with zero detail.

Colour RGB Histogram :
Conventional histograms measure only brightness, as recorded in an image file. But, it is possible to view histograms that not only show overall brightness, but the brightness of each color channel. Most cameras offer the choice to display a brightness histogram or a colour RGB histogram.
For most users, the Brightness histogram is sufficient to evaluate exposure when reviewing images. But, there are situations where it can be useful to view a graph of all three color channels. The RGB histogram can inform a user when there is a color shift , which is useful when trying to white balance a known neutral colored test subject. It can also be helpful for determining whether any single color channel is at risk of being appear too light or too dark.

Highlight alert display:
Most SLR cameras have a setting called “highlight alert”. It will make any overexposed highlights blink when you preview your images on your camera screen. For how to activate this function on your camera please refer your camera manual.

Remember, RAW files will always offer more room to correct exposure and other problems. Correcting improper exposures during image editing in the computer has limitations and often results in a loss of image quality. Histograms give the photographer a tool to evaluate and perform corrections immediately after an image is taken, which means that less time is later spent at the computer trying to optimize images.

Under Exposed

Normal ExposureOver Exposed

SUBSCRIBE TO FOLLOW MY BLOG!!!

Fine Art Prints
Fine Art Prints

Friends, Please visit my photography blog site at bhushanshikhare.wordpress.com and follow my blog by entering your email address in the box provided and clicking SUBSCRIBE button. This way you will receive notification in your email account about any updates I post on my blog. Join now, to stay connected with photography and learn about photography !!!

WANT TO BUY PHOTOGRAPH AS A PRINT?
PRICE FROM: INR 15600.00 / US $255.00

  • All prints are limited edition. Only 840 prints of any size will be made. I reserve the right to keep 15 of each limited edition prints for my own use. So essentially 825 prints are available for sale.
  • All Bhushan Shikhare limited edition prints are assigned a unique number and hand-signed by Bhushan Shikhare. Each image includes a certificate of authenticity.

Bhushan’s Gear

Bhushan Shikhare in the field with gear


One of the most common questions that I am asked is “what gear do you use?”   The products below are what I am currently using. Everything mentioned or listed has been tested by me in the field for years and I can honestly say I think it is the best out there.

In terms of Nikon vs Canon, I think they are both great.   Canon (as well as other manufactures) makes an incredible product.  It is more about what you feel comfortable with.  I personally prefer and use Canon for a number of small reasons, but I would highly recommend Nikon as well.

Please note that although the gear I have listed is fairly expensive, you DO NOT need expensive gear to create excellent images.  Great gear does make a difference in terms of technical quality, durability, ease of use and other factors and I advise using quality products, but creating a powerful, creative image is all about the photographer and the light.

I strongly believe in keeping my gear as light and simple as possible. This is a complete list of all the gear that I use and recommend to my readers.

I use a Canon 5D Mk II and Canon 50D for shooting landscapes and Nature. I carry four lenses total, two of them extremely small and light.   A wide-angle Canon EF 24-105mm L IS USM, a telephoto prime Canon EF 300mm f4 L IS USM, a Canon 1.4X extender, a telephoto zoom Canon 70-300mm L IS USM and a Canon EF 50mm f1.8 prime.

I use a Manfrotto Tripod and Manfrotto ballhead, Hoya ND filters, Hoya polarizing filter and a Lowepro Camera bag.

This list will continue to evolve as my gear changes, as technology continues and as my needs are altered by the work that I am doing.

Welcome to Bhushan Shikhare Nature Photography!

Bhushan Shikhare in the field with gear.


Welcome to Bhushan Shikhare Nature Photography!

Hi, My name is Bhushan Raghavendra Shikhare and I want to thank you for your interest in my work. Welcome to the official website and blog-site of Bhushan Shikhare Photography. I am a fine art nature photographer specializing in wildlife, bird, nature and landscape photography. I am doing photography for more than 10 years. I currently live in Sangli, Maharashtra, India and use a variety of top professional cameras and lenses. My goal as a nature and landscape photographer is to show you views of our natural world in ways that you may not have seen them before through careful composition, attention to detail and the creative use of beautiful light. I am an active member and instructor in ‘Pratibimb Amateur Photographers’ Club’ in Sangli. Go to www.pratibimbsangli.org for more information about ‘Pratibimb Amateur Photographers’ Club, Sangli’.  Please browse my site to learn more about my work. Images are available as prints, or for commercial licensing. My all work is available in the form of fine art prints created with various photographic papers and fine art canvas.  Volume purchases of three or more prints receive discounts off the entire purchase price. Don’t hesitate to CONTACT me. Thank you again for your interest in my work. Please return regularly and consider sharing this website with your friends and family.

Bhushan Raghavendra Shikhare

WANT TO BUY PHOTOGRAPH AS A PRINT?
PRICE FROM: INR 15600.00 / US $255.00

  • All prints are limited edition. Only 840 prints of any size will be made. I reserve the right to keep 15 of each limited edition prints for my own use. So essentially 825 prints are available for sale.
  • All Bhushan Shikhare limited edition prints are assigned a unique number and hand-signed by Bhushan Shikhare. Each image includes a certificate of authenticity.